KEEP YOUR DOG’S NAILS SHORT! If you can hear the nails on a tile or wood floor, they are too long. If they are curling, they are too long! You should be doing your dog’s nails at least weekly! Please make time for this or pay a groomer to do it for you.
If they get too long, it will harm your dog’s skeletal structure. Having long nails changes the way a dog carries himself. The diagram below shows how a long nail causes the bones in the foot to flatten. The different angle of the bones can cause joint stress and can lead to joint pain and arthritis.
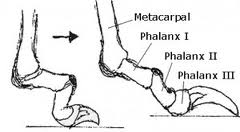
Left: proper alignment with short toenail. Right: angled alignment because of long toenail.
The image provided by Dr. Lisa Kluslow shows how the bones of the paw and wrist angle back when a dog has long nails. All the bones in a dog’s body are connected and the leg bones connect all the way up to the spine. Some of you might relate to how an injury on one part of our body can cause us to carry ourselves differently and create pain in another part of our body. Unfortunately, our dogs can’t tell us when they hurt so let’s prevent them from unnecessary aches and pains.
Frequency: How often you do your dog’s nails depends on the dog, the consistency of the nails, and how fast the nails grow. Some dogs need nails grinded twice a week. Others are okay with every 2 weeks. Personally, we do our dogs’ nails once a week. Frequent walking on pavement (daily, fast paced, long walks) can help wear down nails.
Method: We prefer using a Dremel to grind down dog nails as we feel this is the best way to get the nails short and smooth. With the Dremel, you can grind all around the quick so that it recedes faster and you can get even shorter nails.
Supplies: I like the pet Dremel version best. Here is the link to the Dremel on Amazon: http://www.amazon.com/Dremel-7300-PT-4-8-Volt-Pet-Grooming/dp/B003TU0XG4
I use the 1/2″ by 1/2″ sanding bands on the 1/2″ sanding drum mandrel.
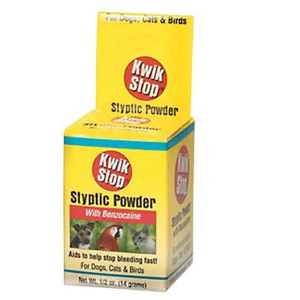
Keep some quick-stop styptic powder nearby. The powder can be used to stop bleeding if you nick the quick. You shouldn’t have to worry about this because you can hear the difference in sound as you get close to the quick, but it is good to keep on hand.
Safety: If you have long hair, you may want to pull it up and out of the way as it could get tangled up in the Dremel. Also, be careful with the little bits of debris that can get in your eyes while you are grinding. It is also a good idea to remove your rings. You don’t want to accidentally grind your wedding ring!
Understanding the Nail: In order to grind nails effectively, it is important to understand how the nail is structured. The nail consists of three main parts: 1) the hard outer shell (“shell”), 2) the moist meaty area between the shell (“meat”), and 3) the quick area of the nail that will bleed if you nick it (“quick”).
- The shell is the old growth. It is essentially dead and dry like the white tips of your own fingernails and toenails.
- The inside meat is the new growth area that is not as hard as the shell, but it does not bleed like the quick.
- Then, there is the quick. This is the portion of the nail that has nerve endings in it and blood. If you nick it, it will hurt the dog and it will bleed.
Grinding the Nails: When you grind or clip nails, you are taking off the outer protective edge and covering of nail (the meat and shell) and trying to expose the quick without making it bleed. The closer you can get to the quick, the more you can force it to recede and the more quickly it will recede.
Some tips:
- Hold the paw with one hand and hold the Dremel with the other hand.
- Gently squeeze the pad of the foot slighly to make the nail easier to access.
- Choke your hand at the top of the Dremel.
- Start by grinding the nail perpendicular to the floor.
- Grind off the sides and corners so that they are not sharp.
- Move the Dremel around at all different angles. The nail will get too hot if you keep it in one spot too long.
- Alternate between the different nails and go back to the nails a few different times.
- Apply some pressure – don’t be scared!
- Take off as much as you can without making the dog uncomfortable and/or bleeding.
- Pay attention to the different sounds. You will notice a difference in the grinding sound when you get through the dry, outer shell and the softer, meaty center. Once you are at the meaty section, proceed with caution.